Monday, 30 December 2019

A bit of scrappy Magic

that bag of interesting off cuts from Nikita is a gift that just keeps on giving and also turning into gifts as well.

A bit of sparkly material with various Flower Fairies by Cicely Mary Baker again just enough to make bags.  They are slightly different sizes to allow for a wider seam allowance on the bag where the selvedge was part of the available material. 

I was pleased that there was enough that each bag had some full fairies and butterflies on each side.  

On one bag both patterned panels were the same, the other has something different on each side.  That is just the way the material worked out.  Both bags are lined.  I did consider adding button embellishments but the buttons I had in mind did not complement the design sufficiently to use.  Ah well I have them for another time.


Both bags are Christmas gifts for my wonderful pen pal, she was visiting today so I was able to give them to her she appears to be pleased with them.


Saturday, 21 December 2019

My turn (pyrography)

for a little box.

This box was gifted to my by my BFF.

It is the second decorate it yourself box she has given me.  The first one, bigger and with the facility to add a material element, embroidery or cross stitch to the top is still waiting for just the right inspiration for it to hit.

This box has also been waiting, I had in my mind that I wanted there to be something on the little handle of the box, and that it should work handle up or down.  Thought about it had ideas, discarded them...then inspiration struck.

A verse from the bible, the insect that is the original meaning of my name as having access to a pyrography tool that would comfortably do what I wanted.


This is the box before varnishing..I had wondered about using some metallic pens in gold and sliver to add a little detail.  However I checked before using them and they were not comparable with the varnish (they ran) so just a straightforward varnishing job.

Found the varnishing on this a little frustrating, I was not getting the depth of shine even after several layers.

Then I had some sparkly silver nail varnish, And I wondered...abut those wings.  So I tested that with the varnish and...nope that did not work either!

Not full satisfied there was a pause................................a very long pause.

And..nothing. I have left it as is for the moment. Unusually for me I have not even added a lining, well not yet.

It is getting used as a place for my bee themed jewellery. At least it is getting used. 

It may get more done to it later, it may not.

Saturday, 14 December 2019

Second bag of green bits

In September I shared a bag made from the scraps left after cutting squares for some gifted-stuff.

I noted that there was still material left over.

So from that comes bag number two, a wider bag with just one strap. 

and the lining is pieced as well from left overs of other bag (for a later sharing).


The bag is different on each side, well made from bits it would be.  There was no pattern it just evolved from the available bits.

So is this all of the bits used up (apart from the squares) well no there are two small panels of sewn together bits that are left.  Not enough on their own  to make an anything but perhaps with some other scraps..there may be a third bag possible.


Monday, 9 December 2019

Advent Calendar 2019 Day 9

This year I have the ninth day of December and day nine of the Advent hop hosted by Jo over at serendipitous stitching.

As usual we share some themed stitching or crafted items and then answer a question posed by our host.


This year I had a little kit for gift tags. A set of eight little cross stitches to complete on a Christmas theme along with eight tags to pop out and stick them on.


I used them for Sunday stitching for several weeks however, with the advent in mind did not share them at the time


I was not sure about using them as gift tags.


I wondered about using them as decorations for the Christmas tree


Then I came across some little black cards in a charity shop and that settled the matter.


Cross stitches on the tags and the tags tied to the cards by the striped cord that came with the kit, so that the tag would swing.

Oh and that means the recipient can always take them off  and use as tags or make new cards of even put them on the tree!


It is a bit difficult to see on these pictures as the background is so dark.

The labels came as a sheet of the decorated card with the labels to be popped out.

That left patterned windows, frames?


If you have visited with me before then you will know I like to use stuff up.

Waste not want not and make do and mend.  I blame the Wombles and the Mice from the Marvelous Mechanical mouse organ.  So the frames, cut apart and stuck onto more little black cards were just the thing for small trees made with very small scraps and bits of thread to finally find a place.

Moving on to the question of my favorite Christmas film.  Well once I would have answered Its A Wonderful Life (which has already made an outing in the Advent this year) which I persuaded a younger friend to watch so she would understand all  the cultural references made to it in more modern American films and TV shows as she did not "do" black and white.


or perhaps The Bishops Wife with the magic tree decorating  ice skating and jolly taxi driver (which again has received a mention thus far)


or maybe some of the jolly musicals with famous songs,, which I shall not name as they have not occurred as yet and someone may be waiting to add them as their choice. I do think those amazing red Christmas dresses had something to do with my fondness for one of those films in particular.


None of those.
Perhaps if you participated in last years blog you will suspect based on my favorite Christmas song what my choice is...yes it is

 The Muppet's Christmas Carol.


I love the light hearted telling of this story. The colours, the little jokes that make me smile and that song, of course that song and the way it manages to make it feel like Christmas.

I hope you all have something that can trigger that feeling for you in this season of giving (as the song calls it) and always throughout the year.

For the rest of Advent at least we all have the hop and the potential of discovering a Christmas film we have not as yet encountered.

And to quote Tiny Tim..God bless us one and all.

Sunday, 24 November 2019

Sunday stitching..and Tom finish

Eyes and back stitching done and Tom is completed. 


I had thought there might have been time to make a start on the next Sunday stitching project, I had considered another Tom with a flower this time.  However, I may have a little step away from the companions and do something Christmas themed going into December.

Sunday, 17 November 2019

Sunday stitching, becoming Tom

Butterfly box completed and gifted and I return to Tom.

All he needs are his eyes and the back stitch, so of course I am thinking what to do next.  Unless something Christmassy occurs I think I will do another Tom.  Tom is so much easier than Ed.


That little bit of back stitching looks exceptionally dark here  and I double checked I had used the right shade, it is right and therefore I am sure once it is all done it will look right and less like I have drawn on the picture with a black marker.

Friday, 8 November 2019

Cross stitch Perforated Paper and no internet


Now the lack of internet as noted on an earlier post was not solely responsible for the lack or Sunday Stitching posts.  Rather Tom was further paused as the approach of my mother’s birthday diverted attention towards a different project.  My first go at using perforated paper, in the form of a box with butterflies on it.

Took a bit of getting used to, there being no resistance, the needle and thread having no drag.  I eventually developed a slightly different technique so the needle did not shoot through and dangle.

You may by now be used to me changing stuff around a bit, this pattern, the box and thread came as a free gift with Cross Stitcher issue 342 (April 2019) and I was perfectly happy as I was sewing the first pastel colours,  the green and the turquoise, moving on to the lilac and the yellow however, I was less sure of the dark blue and very unsure of the bright pink for the bodies of the butterflies. 

Yes it was the butterflies that made this a project for my mother she does like them so.

I left the blue and  bright pink to last, then I left them altogether plumping for a pastel blue and a warm beige. I think they suit the box much better. This is the box before it is a box, with the rejected shades alongside.


This is the box made up and all ready to be used as a gift box for my mother.

cross stitch box


It was an interesting experience, one I won’t mind repeating should the opportunity arise however, I do not believe I will be actively seeking an opportunity to do so!

Thursday, 7 November 2019

No Internet equals ?


There is a suspicion that looking at stuff on the internet results in less productivity in actually stitching.  I guess there is indeed some truth in that as whilst I had only connectivity via the library this project does appear to have made quite a bit of progress.

Of course the fact that I have not been able to post any progress  for quite some time  may also account for some of that.


Tuesday, 29 October 2019

Blog hop 2019

If you visited this post before 2 November 2019 then you will have had a different experience to those visiting after that date.  Why, well because of a mix up by my internet provider I had no internet access at home in the run up to Halloween.

Whilst I had my stitching all ready, I had no idea what letter I was to share or access to my blog to share it.

A code and password for temporary wifi access was sadly no help until today as the signal did not reach my home. Not sure what made it work today!

So having tried various options and with a promised fix after the blog date it was off to the library, firstly to read my e-mail from Jo and get the letter and then to get into blogger to write a very basic picture less post that would at least ensure the letter would be available on time for those raring to start hopping as soon as 31st got underway.

So I am updating now to add the picture that should have made its appearance sooner.

This is based on a free patten from Durene Jones she shared on Facebook this year, she has an etsy  page under Durene J Cross Stitch.  I played around with the size, the thread and left some elements off.  The pattern is delightful in the way it allows for that.

The original design is sewn using two strands on 14 count 27 stitches by 106 giving a finished design size of 1.9 by 7.6 inches and using 5 shades of DMC thread.
Mine is sewn using one thread over one on grey linen.  Actually, on some of the off cuts from framing Nantucket Rose. Resulting in a finished size just over 1 inch by just a shade over 3 inches.
I used random threads form my collection of non-branded thread and 6 shades in total plus a little extra something for the details on the face. 


I think she is rather cute…now some of you who have been popping in for a visit for a while will figure out quite easily what the little extra something for the back stitch is, and for any one else here is a little clue  (it was popular with the Victorians.


So the letter is U...I know nothing fancy but at least it is there I will see if I can pretty it up later if I get the chance.

The next page is http://alchymyst.blogspot.com/

and I hope you have fun with the hop

Just in case you want a little Halloween from my blog try these links to previous years.

bat

bear

pumpkin

witch

Oh and if you did not arrive here from the hop home page just head on over to serendipitous stitching (there is a link on the right of this blog) and join in the fun.


Sunday, 20 October 2019

Still making progress and

Descending from the heavens into the sky, this progress is made up of one blended colour and two solid shades.

Stitching goes much faster with the solids when I don't have to keep stopping to blend.


This feels like a lot of progress.

Sunday, 13 October 2019

More progress, still a way to go...


Now that I have started with that big empty space in the middle it feels as if this will go better than anticipated.  There are some solid colour stitches in amongst the tweeded / blended stitches and that always feels faster.

Sunday, 6 October 2019

Sunday Stitching, conference.

as noted last week Tom has a wait and this more complex project gets worked on for general conference.

There was some ninja hunting, some filling in (smoke) a tiny little extension into that empty middle but mostly the nice straightforward easy edges of the text box at the bottom of the pattern.


My mother is still waiting for more colour?

Tuesday, 1 October 2019

Sampler Quilt. Honey Bee block finished.

As previously noted I decided to do the needle turn method of the applique elements of this block.  It did indeed produce a nice edge but I did struggle with the placement.

I drew onto the bock where the pieces should go.  I lined up the points with pins, pinned in place and then tacked and then, of course! They magically moved. 

The block remains within the general style of the quilt and the moto of this blog so I am not dissatisfied with my choice.

I used washable marker pens by Crayola to mark out the placement lines and the sewing lines.  This is the block after rinsing and pressing.

Honey Bee
It is squarer than my picture makes it look!

Mulling over the colour choices for the next block.  Admittedly a little with the "replacement" block options in mind.  I doubt anyone who also frequents quilting pages on Facebook will be surprised at what that is going to be.

Then one other additional block to make it up to the 20, sizing and...getting ahead of myself.  Grape basket (also seen it called a flower basket is next) and to paraphrase some scripture  let today's block be sufficient unto the day!

Sunday, 29 September 2019

Sunday Stitching..these boots are

red...well aren't they always red on Tom's feet?


Now although Tom is so very close to being finished as it is General conference next weekend my larger project , last seen in my post the-sands-of-time. is more likely to come out to be worked on.

Saturday, 28 September 2019

Sampler quilt - Honey bee

Moving on to the next block, now this one is part machine sewn and part hand applique. 

First a nine patch, with a border 


Then for the applique


This is the lay out


Fiddly as I found it, needle turn did give a much nicer edge and it is OK for T.V sewing that is what I intend to do.

Friday, 27 September 2019

Gifted stuff

I have, depending on your point of view a bad or good habit of  accepting gifts of "material" in various forms. I may at the time have no idea what it will go with or even what I will do with it but regardless 9.5 times out of ten if I am asked do you want some material the word yes hurtles out of my mouth. 

That can lead to the gifted whatever it is spending some time as loft insulation before a project for it arises.

So a bit of "see what is in this bag" sorting in the loft and I came across some green material with  little pink and yellow flowers.  I can't recall when I was given it or by who, although I wonder if it was amongst remnants from a craft play scheme, or perhaps not.

It had been a duvet cover, with a slightly different pattern (more flower heavy) on one side to the other. Each side had a very large circle cut from it (cloaks from the crafts, or had someone been making round tablecloths?) So what I had was the corners and some edge bits.

Such an irregular shape it was hard to fold and I figured the best way to deal with it was to emulate some scrap quilters method and just cut it into squares of a set size.  No project yet in mind but they will be there all cut when I do.

Used the 6.5 " square ruler for that and the rotary cutter.  Produced 80 squares and bits. Oh some fair sized bits, too small to get a 6.5 square but to my mind too big to throw away and too big to add to my Bits-A Quilt.  Also as the idea here was to reduce if ever so slightly the loft insulation, putting the bits back  was not going to meet up with that.  So what to do with them.

I have mentioned before that the local council at the annual show often gives away cloth bags as part of their push for less waste (not that they did this year) and I have received those bags.  Indeed it is one of those bags that featured in my post in-to-2017 although the pictures in that post are all of the decoration and not the bag. 

The original bag is cream cotton with the statement "Love Food, Hate Waste" on it in green  with the O as a tomato on one side and "Recycle" on the other.  I had managed to get one of the bags stained with red onion and it would not wash out . So I figured I would used the bag as a lining, the scraps as the new outside for the bag.  For handles I would use the hemmed edge from the duvet. The old handles will come in handy as ties for things in the loft being stored in rolls.

I sewed the bits together  in wide strips the width of the bag until I had one section  double the height of the bag.  Sewed the sides together.  Turned it right side out, slipped the original bag inside then turned the hem over the upper edge.

For extra strength I machine stitched round the top of the bag just below the inner hem (it was a bit too thick to sew on the inner hem itself.

A strengthening row of stitches to the handles and then  added them by hand also. And this is the finished bag.


So all the bits used up then? Alas or perhaps joyfully no.  I have bits left which I hope might stretch to another bag, perhaps with some other bits and pieces.

This is a picture of my joining hem for the outer and inner bag.


 and how the handles are attached, just in case you wondered.


Monday, 23 September 2019

Sampler quilt Needle turned

Well I got it finished, I think I am finished with it...when I come to put the whole top together I might decide it needs another colour in the middle to bring the blocks together.  I did see a variation in the book with a circle in the middle so that remains an option.


The sewing method did grow on me a bit as I progressed and it did produce a smoother  looking edge that the previous turning method so I am not counting it out just yet. Indeed the next pattern in the book is a combination pattern  with the possibility of repeating this method.

I notice that the book has two patterns left to go (not including the skipped one) so once they are done I will have to come up with two more, one to replace the bias binding patch and one to bring the number up to twenty.  The book did allow  for a repeat pattern. 

Sunday, 22 September 2019

Sunday Stitching--finding my feet?

well Toms feet. Both shades came with the kit which is a bonus.


funnily enough one of the talks today was about methods of remembering the points made in talks and conference addresses. So in this instance Tom's feet, well they should remind me of that.

Saturday, 21 September 2019

Sampler Quilt needle turn aplique

This was a bit scary, the book said to have a seam allowance of  1/8 inch.

What! I have only just got used to the quarter inch stitch that the book calls for in the other patterns.  My safety net is a half inch seam allowance (try not to shout or tut too much at that, each to their own) so this was a bit of a shock.

I read and read the instructions in the book on this method,  left it, went back and read it again and nope just not going in.  Time to turn to the internet and you tube. 

First video Shiny Happy World Dot Com  there is an advert before it starts but you do get the option to skip the advert. On this one it starts straight in on the needle turning.  Other ones I found start much earlier in the process  with  marking out and cutting the shape before getting to the stitching part, some took a good nine and a half minuets to get to the sewing method.  After I watched this a time or two I thought I had it in my head.

Then foolishly thinking to reinforce it I watched another, and it looked a different sewing method mind it had a good technique for points., nice sharp points on stars.Cathy Van Bruggen Designs.

I note both of these, and others that I looked at but have not put in a link for as they took soooo long or were not as easy to watch, had much wider seams.  Mine are cut larger than recommended (too scary) apart from the sections where the edges of the pattern do not allow for anything but almost nothing!

So first to practice the stitch on something other than my block, a scrap on a scrap and see how I get on.  And if I get the hang of it, well lets be honest, if it feels reasonable, I will then move onto my block.

One of the videos I viewed suggested a heart made a good practice shape as it has curves, outward and inward points so that is what I used .


The points turned out better than the curves and there were some other issues however I did feel I could make a start on the block itself.


Friday, 13 September 2019

Sampler quilt - Hawaiian Applique

Crocus Design.

At least that is the chapter heading for this block.  Not the next in the book, the next one was Stained Glass Patchwork - Tulip block.  It required bias binding to make the leaded part of the stain glass.  After some consideration I am skipping that one.  I don't feel like making the bias binding or buying a tool to make it.  I expect I won't go back to it and will replace it with something else that is new.

Anyway back to this one, it is based on a particular style but the author diverges from the traditional in both the use of a patterned fabric instead of a solid and the design which she has based on a flower that grows in England rather than the more tropical.  Mind she does note many have told her it looks more like a tulip than a crocus.

I did consider using the technique to make a pattern of my own  however as I was skipping to this pattern on the grounds of ease complicating it trying to come up with a design of my own did not feel right.

This is it tacked to the backing , it is waiting for edges to be hemmed and at the same time to be sewn to the backing square.  That should sharpen the image.

Crocus pattern?

At the moment, pre-hemming it feels a bit too much of the centre colour  and I am considering the possibility of adding a circle to the middle of a different colour (more deviations from the source style) but I will wait till the hemming is done to decide if that is needed either for this block or for the quilt overall.

Sunday, 8 September 2019

Sampler quilt..wild geese?

Well here is my attempt to turn two large and eight small squares into eight big triangles and sixteen little triangles.

I am going to show you the pictures I took of the stages and the the end (sort of) result.

Here we go


Big squares with little one's on the corner


Touching corners trimmed off


Then you sew a line quarter inch either side of the diagonal in the middle


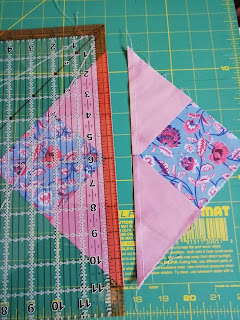
then cut on that diagonal line.


small squares in the other corner , then a similar set of sewing and cutting.


gets the components of flying geese...well sort of gliding not quite falling  geese


sew together the units

and again and you get the wild geese block


Oh looking at that I am getting so much better at taking pictures as this looks so much better in this picture than in reality (makes a change) as the points look better than they are and squaring up the sides to fit into the quilt is not going to be as easy as cropping the photo.

Now on reflection I can see the merits of this method and that it will be much quicker than cutting out individual triangles and sewing them together.  My only concern with it is if you go wrong then you have gone wrong on several pieces and not just one.

I remain more unique than perfect in my quilts and ever hopeful that once I get to the quilting, the quilting will help to hide or correct a multitude of uniqueness.